
TABLE OF CONTENTS
Grab your smartphone or video camera. Let’s craft videos for YouTube and social media. Did you verify your device is set to record the correct resolution, frame rate, format, and orientation? Do you have the right gear? If unsure, I recommend you continue reading my video recording guide.
INTRODUCTION
According to YouTube’s Official Blog, 500+ hours of content are uploaded every minute. I can only imagine what it looks like to store all that digital content. Regardless, you can probably guess that competition is high when growing an audience on YouTube, and other social media platforms like Facebook, Instagram, TikTok, and more.
VVebCraft’s video recording guide is meant to help you make an impactful impression. It’s not as easy as you may think. There are many steps involved. You should understand your equipment, techniques, formats, audio, editing, transcoding, search engine optimization, hashtags, photo editing, and more. It all depends on how much impact you want to make on an audience and gain a competitive edge.
The following information sets a foundation for recording videos optimized for YouTube and other social media platforms. These tips will help you whether you take on the task yourself or work with VVebCraft. After all, the entire process starts with how you craft videos.
VIDEO CONFIGURATION
The first step is to verify that your smartphone or video camera is set to create videos optimized for YouTube and various social media platforms. The key elements to focus on are orientation, format, and resolution. You’ll adjust some settings on your device, but you’ll have to remember the orientation every time you craft videos. Let’s take a look.
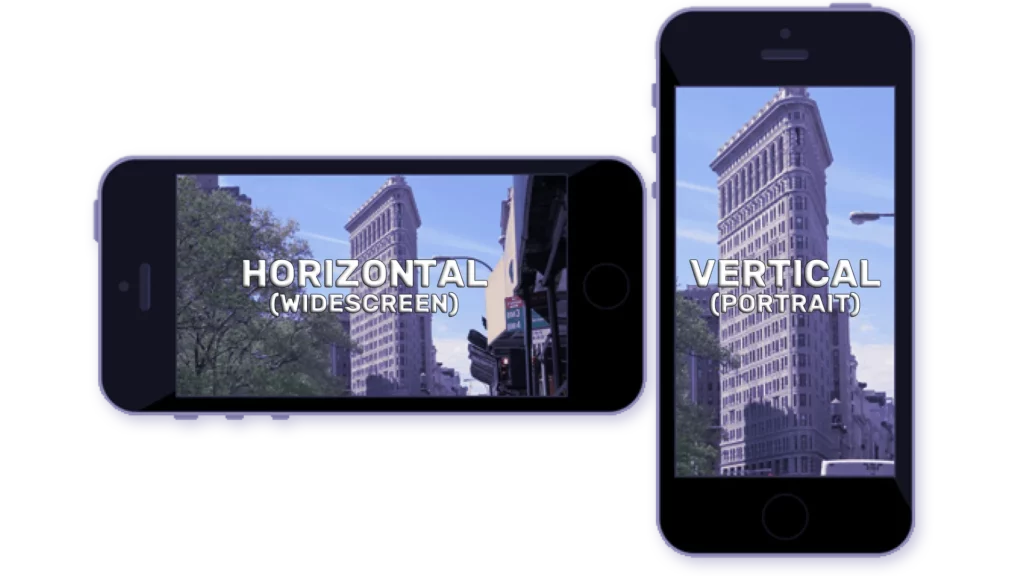
ORIENTATION
The two common orientations we see when we watch videos are horizontal (widescreen) and vertical (portrait). Horizontal is what you see when you watch movies, television, and YouTube videos. A horizontal orientation most likely occurs when you hold your phone horizontally. It is commonly used when watching videos longer than a minute.
You’ll watch most short videos in portrait (vertical) mode. The vertical orientation is popular with YouTube shorts, Reels, and TikTok videos. Portrait videos are popular on mobile platforms because the viewer can hold their device comfortably, and the videos are short.
VIDEO FORMAT
Compatibility, quality, file size, editing, and streaming all impact a preferred video format. Choosing the correct video format for the platform you plan to display your video content can impact your level of success and cost. Some format options are optional, while some are required. Let’s take a look at the basics.
Video formats come in many flavors, each with its pros and cons. MP4, MOV, AVI, WMV, MKV, FLV, and MPEG are the most common video formats. Most digital video cameras allow you to set the type of video format you want to record with. The most common and highly recommended video format is MP4.
MP4 is supported by most software, making it highly versatile. Video editors like me will tell you that it is the easiest video format to edit. The file size depends on multiple factors, but MP4 tends to be lower than other video formats. The quality is nice and doesn’t appear overly compressed. I recommend setting your video camera to use the MP4 video format.
RESOLUTION
The resolution of a video is measured by pixels. Pixels run horizontally and vertically on a display. The resolution measurement looks something like 1920×1080. The clarity of a video is determined by its resolution. A higher resolution renders a better picture, yielding a crisper, detailed video. Look at the following image for a visual representation of common resolutions and their measurements.
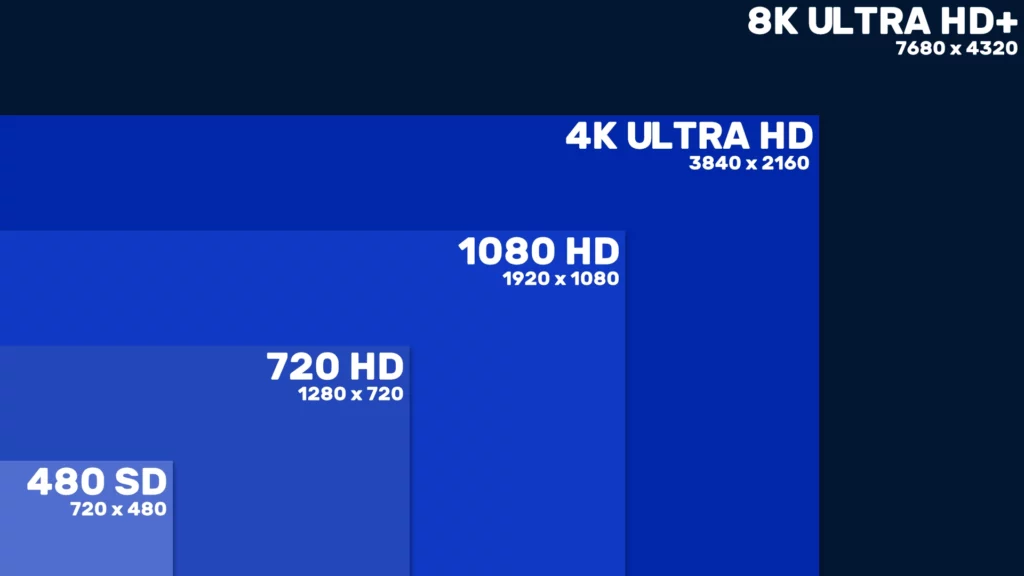
Displays may be attached to a television, monitor, tablet, smartphone, or a similar device. We all want our videos to look super crisp, and a higher resolution will give us what we want. However, it is important to remember that a higher resolution can be problematic. Let’s look at an example.
1080p is the most common resolution, but 4K is rising in popularity because of its sharp, detailed picture. 4K has been around for many years, but its gain in popularity is slow. Cost isn’t an issue because it is easy to find affordable 4K devices. It’s because of bandwidth. We stream most of our video, and 4K videos are large. Many homes have internet that can’t support streaming due to 4K’s demand.
1080p remains the champion. However, I recommend recording in 4K resolution. One reason is that you want to future-proof your videos. 4K will eventually be the champion. Another reason is that videos are hosted by platforms that automatically create various resolutions of the same video. If you upload a 4K video, the platform will automatically create 1080p and 720p versions of the same video. The viewer can pick a version themselves, or the network bandwidth will automatically adjust the resolution.
LIGHTING
Dark videos get swiped away fast. Who wants to watch something you can’t see? Too much light can have the same effect. A glare can blind a viewer. It’s important to be aware of light sources where you record video. Here are a few quick tips.
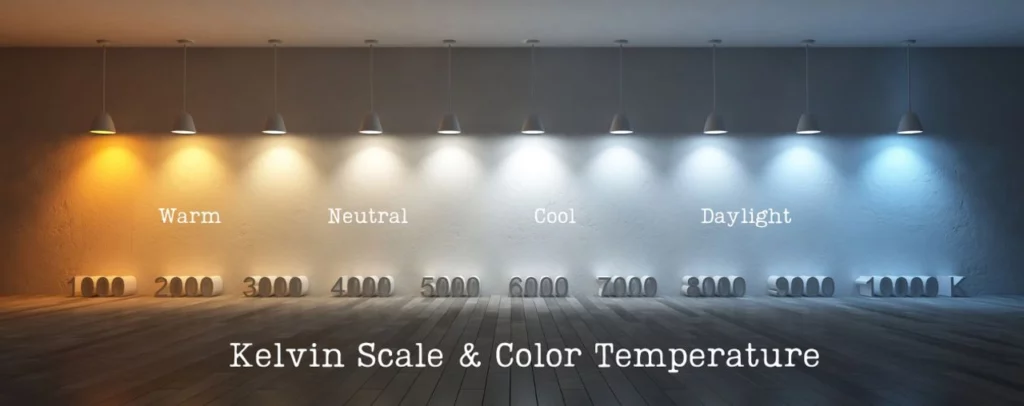
You don’t have to buy expensive lights. If you are like me, you’ll work with what you’ve got, and it’s usually enough. I have found that a cooler color temperature works best, specifically in the daylight spectrum. I’m not an expert in lighting, but my research agrees that the daylight spectrum falls between 5000- 6500 K on the Kelvin Temperature Scale. See the image below.
Keep the light in front of you. You don’t want so much light that you are squinting, so avoid direct sunlight as a light source. Daylight bulbs in front or vertically and diagonally above in front of you can work. If you want to use a green screen, stick with vertically and diagonally above in front to help combat shadows on the green screen.
AUDIO
You can use several methods to capture audio. Most video cameras and smartphones have a microphone attached to the device, but I don’t recommend using it. The built-in microphone is okay for general use, but not for videos you want to represent your business.
WIRED MICS
Wired mics come in many formats. They can sit on your desk, attach to an adjustable arm, or clip onto your shirt. Their direct connection to a video recording device helps alleviate interference from other devices, such as radio waves. Interference can cause audio dropouts or digital blip sounds.
Wired mics do have a few drawbacks. They don’t look good. They either sit near your face, or the wires get in the way. You can hide them as best as possible, but that can make things more cumbersome. The format of the video decides whether these drawbacks are a gamebreaker or not.
WIRELESS MICS
Wireless mics come in the same formats as wired mics do. However, they are generally preferred by those who need mobility. You are not tethered to the video recording device, so as long as you stay within the manufacturer’s recommended distance, you can move and use your hands freely. They look better because they are small or can be hidden more easily than wired mics.
Several drawbacks of wired mics exist. They do need to be charged. You are doomed if you forget to charge them. You’ll need to plug them in and wait, which means finding something else to do in the meantime. Wireless mics are susceptible to interference. Radio waves can cause audio issues. This can be frustrating when you record a video only to find out the audio has dropped out.
TESTING
It is imperative to test your setup. You don’t want to craft videos with the expectation that you got everything right, only to find out you missed something. This guide does not automatically result in success. Sometimes you must adjust based on location, lighting, equipment, resources, and experience.
Record some short videos once you have a base understanding and your setup feels complete. Craft videos around 15 seconds long in areas you plan to use for the real thing. Once you have a few, transfer them to your computer and view them. Make sure your monitor is color-calibrated, or your display may deceive you.
VVEBCRAFT’S KEY INSIGHTS
I hope you found my video recording guide helpful. The level of professionalism and impact begins with recording the video. Editors have the tools to fix inconsistencies, but starting with a good raw video alleviates the need for digital manipulation. The more an editor has to clean up a video, the less authentic it becomes. Viewers notice these things, and it can create a negative impact.
Competition continues and will continue to grow. The demand for quality content will continue to grow, too. VVebCraft is here to help you succeed. Contact me if you want an edge on the competition. You record the video, and I work the magic. Do you need proof? Check out Sword Wolf Forge on YouTube. I take care of all their video content and web solution needs.